Master StatCrunch Calculator: The Ultimate Guide
For anyone delving into statistical analysis, a statcrunch calculator proves to be an invaluable asset. This interactive, web-based statistical software offers a user-friendly platform for data manipulation and visualization. Pearson, the educational publishing giant, develops and maintains StatCrunch, ensuring its reliability and alignment with academic standards. The use of hypothesis testing, a core statistical concept, becomes remarkably streamlined through the statcrunch calculator's intuitive interface. Further enhancing its utility, various online tutorials and help resources are available at Arizona State University, supporting learners in effectively harnessing the full potential of the statcrunch calculator.
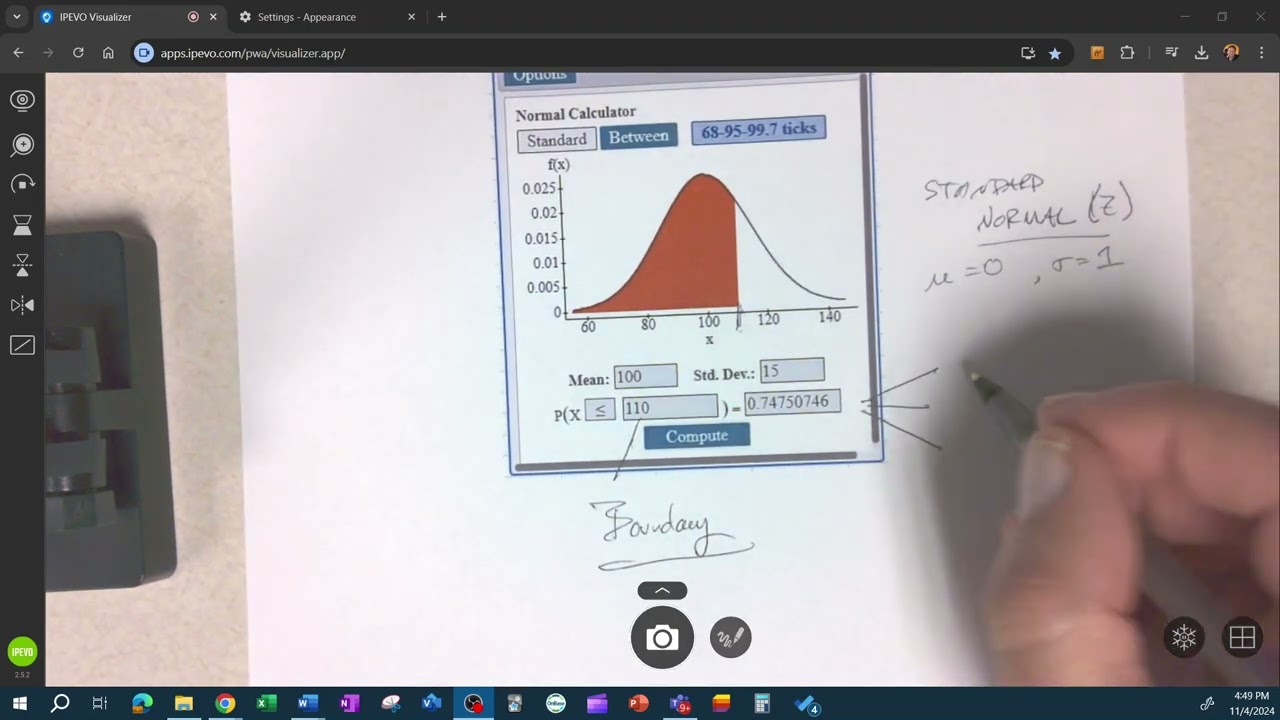
Image taken from the YouTube channel MathGuy , from the video titled StatCrunch Normal Calculator .
StatCrunch stands out as a user-friendly, web-based statistical software package designed to empower users across various skill levels.
From students venturing into the realm of statistical analysis to seasoned researchers needing a reliable tool, StatCrunch offers a compelling blend of accessibility and powerful features.
It's more than just a calculator; it's a comprehensive platform that simplifies data analysis, visualization, and interpretation.
What is StatCrunch and Why Choose It?
StatCrunch is a web-based statistical software renowned for its ease of use and accessibility.
Unlike traditional desktop software, StatCrunch operates entirely within a web browser, eliminating the need for installations and updates. This makes it an ideal tool for both individual use and collaborative projects.
Key Benefits of Using StatCrunch:
- Accessibility: Access StatCrunch from any device with an internet connection.
- Ease of Use: Intuitive interface simplifies complex statistical analyses.
- Collaboration: Share data and results seamlessly with colleagues or students.
- Cost-Effective: Subscription-based model offers affordability compared to other statistical packages.
- Comprehensive Features: Covering a wide range of statistical procedures from basic descriptive statistics to advanced regression analysis.
StatCrunch vs. Other Statistical Software
While numerous statistical software options exist, StatCrunch carves its niche with its unique strengths.
Compared to comprehensive, yet complex, tools like SPSS or SAS, StatCrunch presents a gentler learning curve, making it particularly attractive for beginners.
Compared to Excel, StatCrunch offers a more robust and statistically sound platform, avoiding the pitfalls of relying solely on spreadsheet software for advanced analysis.
Here's a brief comparison:
- SPSS/SAS: Powerful but complex; suitable for advanced users and large-scale datasets.
- Excel: Widely accessible but limited in statistical capabilities and prone to errors.
- R: Highly flexible and customizable but requires programming knowledge.
- StatCrunch: Balances power and simplicity; ideal for teaching, learning, and general statistical analysis.
Accessing StatCrunch: Your Gateway to Statistical Analysis
Gaining access to StatCrunch is straightforward, primarily through subscription-based models.
Pearson Education, the company behind StatCrunch, offers various subscription options tailored to different needs, including individual subscriptions and institutional licenses.
Subscription Options
- Individual Subscription: Purchase directly from the StatCrunch website for personal use.
- Pearson MyLab Integration: Often bundled with Pearson's MyLab courses for statistics, providing seamless integration with course materials.
- Institutional License: Colleges and universities can purchase site licenses for their students and faculty.
Step-by-Step Access Instructions via StatCrunch Website/Interface
- Visit the StatCrunch Website: Open your web browser and navigate to the official StatCrunch website (usually accessible through Pearson's website or a direct StatCrunch URL).
- Create or Log In to Your Pearson Account: If you don't have a Pearson account, you'll need to create one. If you already have an account (e.g., from a MyLab course), use your existing credentials.
- Enter Access Code or Purchase Subscription: If you have an access code (usually obtained through a textbook or course), enter it when prompted. Otherwise, you'll be directed to purchase a subscription.
- Launch StatCrunch: Once your subscription is active, you can launch StatCrunch directly from the website. Look for a button or link that says "Launch StatCrunch" or similar.
- Start Analyzing Data: The StatCrunch interface will load in your browser, ready for you to input data or import datasets for analysis.
Navigating the StatCrunch Interface
Familiarizing yourself with the StatCrunch interface is crucial for efficient and effective data analysis.
The interface is designed to be intuitive, with clearly labeled menus and toolbars.
Key Components of the StatCrunch Interface:
- Data Table: The central area where you enter, import, and view your data. Data is organized in columns (variables) and rows (observations).
- Menu Bar: Located at the top of the screen, the menu bar provides access to various functions, including "Data," "Stat," "Graph," and "Help."
- Toolbar: Provides quick access to commonly used functions, such as opening, saving, printing, and copying data.
- Results Window: Displays the output of your statistical analyses, including tables, graphs, and text-based results.
- Applets: Interactive tools for visualizing and exploring statistical concepts. Accessible via the "Applets" menu.
[Include a Screenshot of the StatCrunch Interface Here with Callouts Highlighting Key Components.]
Example Callouts: "Menu Bar" "Data Table" "Toolbar"
By understanding the layout and key components of the StatCrunch interface, you'll be well-equipped to navigate the software and perform a wide range of statistical analyses with confidence.
StatCrunch distinguishes itself through its accessibility and user-friendliness.
But the real power of any statistical software lies in its ability to transform raw data into meaningful insights.
We now shift our focus to the fundamental building blocks of data analysis within StatCrunch: the calculator functions.
These functions provide the essential tools to summarize and interpret data. Mastering these basics paves the way for more sophisticated explorations.
Mastering Basic Calculator Functions for Data Insights
The StatCrunch calculator isn't just a digital replica of a handheld device.
It's a gateway to unlocking the secrets hidden within your data.
By understanding how to leverage its functions, you can quickly compute essential statistical measures.
These measures can provide valuable insights into the characteristics of your dataset.
Exploring Essential Statistical Measures
The StatCrunch calculator is equipped to handle a variety of fundamental statistical calculations.
Here’s a look at some key measures and how to calculate them:
-
Mean: The average value of a dataset, calculated by summing all values and dividing by the number of values. It's sensitive to outliers.
-
Median: The middle value in a sorted dataset. It's a more robust measure of central tendency, less affected by extreme values.
-
Standard Deviation: A measure of the spread or dispersion of data around the mean. A higher standard deviation indicates greater variability.
-
Variance: The square of the standard deviation. It also quantifies the spread of data, but is less intuitive to interpret than the standard deviation.
-
Quartiles: Values that divide a dataset into four equal parts.
- Q1 (25th percentile): The value below which 25% of the data falls.
- Q2 (50th percentile): The median.
- Q3 (75th percentile): The value below which 75% of the data falls.
Quartiles help you understand the distribution and skewness of your data.
Step-by-Step Guide to Using the Calculator
Let's walk through an example to illustrate how to use the StatCrunch calculator:
-
Open the Calculator: In StatCrunch, navigate to Data > Compute > Expression.
-
Build Your Expression: Use the function list and the data column names to create your calculation. For instance, to calculate the mean of a column named "Scores," you might use the expression
mean(Scores). -
Compute: Click "Compute" to execute the calculation. The result will be displayed in a new column in your data table.
Example: Calculating the Mean
Let's say you have a column named "ExamScores" containing the scores of students on an exam.
To find the average exam score, follow these steps:
-
Open the Expression window as described above.
-
Type
mean(ExamScores)into the expression box. -
Click Compute. A new column will appear in your data table. This column will contain a single value: the mean of the "ExamScores" column.
Visual Aids: Screenshots
(Include a series of screenshots here demonstrating each step of the calculation process, highlighting the relevant buttons and fields in the StatCrunch interface. Each screenshot should have a brief caption explaining the step being shown.)
Inputting and Manipulating Data Sets
Before you can perform calculations, you need to get your data into StatCrunch.
There are two primary ways to do this: manual entry and importing from external files.
Manual Data Entry
-
Open a New Data Table: In StatCrunch, select Data > New. This will create a blank spreadsheet-like table.
-
Enter Your Data: Click on the cells in the table and type in your data values. Name your columns appropriately.
Importing Data from External Files
StatCrunch supports various file formats, including CSV (Comma Separated Values) and Excel (.xls or .xlsx).
-
Select Import Option: Go to Data > Load Data > From File.
-
Choose Your File: Browse to the location of your file and select it.
-
Configure Import Settings: StatCrunch will present you with options for how to import the data, such as specifying the delimiter (e.g., comma, tab) and whether the first row contains column headers.
-
Import: Click Load Data to import the data into StatCrunch.
Data Manipulation: A Quick Overview
StatCrunch offers several tools for manipulating your data after it's been entered or imported.
-
Sorting: Arrange your data in ascending or descending order.
-
Deleting Rows or Columns: Remove unwanted data.
-
Creating New Columns: Generate new variables based on existing ones using formulas or functions.
-
Recoding Values: Change the values of existing variables (e.g., recode numerical scores into letter grades).
By mastering these data input and manipulation techniques, you ensure that your data is clean, organized, and ready for analysis.
These basic calculator functions in StatCrunch provide the foundation for performing more complex statistical analyses. Practice using these tools to build confidence and proficiency in data exploration.
StatCrunch distinguishes itself through its accessibility and user-friendliness. But the real power of any statistical software lies in its ability to transform raw data into meaningful insights. We now shift our focus to the fundamental building blocks of data analysis within StatCrunch: the calculator functions. These functions provide the essential tools to summarize and interpret data. Mastering these basics paves the way for more sophisticated explorations.
Confidence Intervals: Estimating Population Parameters with Precision
After laying the groundwork with calculator functions, we can now tackle more complex statistical concepts. One such concept is confidence intervals. They are essential tools for making inferences about populations based on sample data. Let's explore how to use StatCrunch to calculate and interpret them effectively.
Understanding Confidence Intervals
A confidence interval provides a range of values within which we believe a population parameter lies. It is not simply a single point estimate, but rather a plausible range.
Two key components define a confidence interval: the margin of error and the confidence level.
Margin of Error
The margin of error quantifies the uncertainty associated with our estimate. It represents the amount by which our sample statistic might differ from the true population parameter.
A smaller margin of error indicates a more precise estimate. It suggests we have a narrower range within which the true value likely resides.
Confidence Level
The confidence level expresses the probability that the interval contains the true population parameter. A 95% confidence level, for example, suggests that if we were to repeat the sampling process many times, 95% of the resulting confidence intervals would contain the true population parameter.
It is crucial to remember that a confidence interval does not guarantee that the true value lies within the calculated range. It provides a probabilistic statement about the likelihood of capturing the true parameter.
Calculating Confidence Intervals for Means and Proportions in StatCrunch
StatCrunch simplifies the calculation of confidence intervals for various parameters, including means and proportions.
The choice of the appropriate distribution (t or z) depends on the sample size and whether the population standard deviation is known.
Confidence Intervals for Means
When calculating a confidence interval for a mean, StatCrunch offers both z-intervals and t-intervals.
- Z-Interval: Use the z-interval when the population standard deviation is known and the sample size is relatively large (typically n > 30). To perform a Z-test in StatCrunch, navigate to Stat > Z stats > One sample > With summary. Enter the sample mean, standard deviation, and sample size. Specify the desired confidence level and compute.
- T-Interval: Use the t-interval when the population standard deviation is unknown and must be estimated from the sample. This is typically the case in real-world scenarios. To perform a T-test in StatCrunch, navigate to Stat > T stats > One sample > With summary. Enter the sample mean, standard deviation, and sample size. Specify the desired confidence level and compute.
Confidence Intervals for Proportions
To calculate a confidence interval for a proportion in StatCrunch, navigate to Stat > Proportion stats > One sample > With summary. Enter the number of successes and the number of observations. Specify the desired confidence level and compute.
Interpreting the Results of Confidence Intervals
The interpretation of a confidence interval is crucial for drawing meaningful conclusions.
A confidence interval provides a range of plausible values for the population parameter. For example, a 95% confidence interval for the mean of a population might be (45, 55).
This suggests that we are 95% confident that the true population mean lies between 45 and 55.
It is important to avoid misinterpreting confidence intervals as providing the probability that the true population mean lies within the calculated range. Instead, focus on the idea that the interval was constructed using a method that, in the long run, would capture the true mean 95% of the time.
By understanding and applying confidence intervals using StatCrunch, you can make more informed decisions based on sample data. These intervals help to quantify the uncertainty inherent in statistical estimation, allowing for a more nuanced understanding of your data.
Exploring Probability Distributions: Understanding Randomness and Likelihood
With the ability to generate confidence intervals, we gain a powerful tool for estimating population parameters. But to truly harness the potential of statistical analysis, we must delve into the world of probability distributions. These distributions form the bedrock for understanding and quantifying randomness, allowing us to make informed decisions in the face of uncertainty.
This section provides an overview of some common probability distributions and demonstrates how to use StatCrunch to calculate probabilities associated with them. We will also explore practical examples of how these distributions are applied in real-world scenarios.
Overview of Probability Distributions
Probability distributions are mathematical functions that describe the likelihood of different outcomes or values for a random variable. Understanding these distributions is crucial for statistical inference and decision-making. Let's take a look at three key probability distributions.
The Normal Distribution
The normal distribution, also known as the Gaussian distribution, is perhaps the most ubiquitous distribution in statistics. It is characterized by its bell-shaped curve, where the mean, median, and mode are all equal.
Many natural phenomena, such as heights and weights, tend to follow a normal distribution, making it a valuable tool for modeling and analyzing data. The normal distribution is fully defined by two parameters: the mean (μ) and the standard deviation (σ).
The Binomial Distribution
The binomial distribution models the probability of obtaining a certain number of successes in a fixed number of independent trials, where each trial has only two possible outcomes (success or failure).
For instance, consider flipping a coin multiple times and counting the number of times it lands on heads. The binomial distribution is defined by two parameters: the number of trials (n) and the probability of success on a single trial (p).
The Poisson Distribution
The Poisson distribution is used to model the number of events occurring within a specific time period or location. These events must be independent and occur at a constant average rate.
Examples include the number of customers arriving at a store in an hour or the number of defects found in a manufactured product. The Poisson distribution is defined by a single parameter: the average rate of occurrence (λ).
Using StatCrunch to Calculate Probabilities
StatCrunch offers powerful tools to calculate probabilities for various distributions. By leveraging StatCrunch, you can determine the likelihood of specific outcomes and gain deeper insights into your data. Let's explore how to calculate probabilities for the normal, binomial, and Poisson distributions.
Calculating Normal Probabilities in StatCrunch
To calculate normal probabilities in StatCrunch, navigate to Stat > Calculators > Normal.
Enter the mean and standard deviation of the distribution, and then specify the desired range of values. StatCrunch will then calculate the probability of the random variable falling within that range.
You can calculate P(X < x), P(X > x), or P(a < X < b), where X is the random variable and a, b, and x are specific values.
Calculating Binomial Probabilities in StatCrunch
To calculate binomial probabilities, go to Stat > Calculators > Binomial.
Enter the number of trials (n) and the probability of success (p).
You can then calculate the probability of obtaining a specific number of successes (e.g., P(X = k), P(X ≤ k), P(X ≥ k)), where X is the number of successes and k is a specific value.
Calculating Poisson Probabilities in StatCrunch
To calculate Poisson probabilities, navigate to Stat > Calculators > Poisson.
Enter the mean rate of occurrence (λ). Similar to the binomial distribution, you can then calculate the probability of observing a specific number of events within the specified time period or location (e.g., P(X = k), P(X ≤ k), P(X ≥ k)).
Applying Probability Distributions to Real-World Problems
Probability distributions are not just theoretical constructs; they are valuable tools for solving real-world problems across various disciplines. Let's consider some examples.
Example 1: Quality Control
A manufacturing company produces light bulbs. The lifespan of these bulbs follows a normal distribution with a mean of 800 hours and a standard deviation of 50 hours. What is the probability that a randomly selected bulb will last longer than 900 hours?
Using StatCrunch's normal calculator, you can input the mean and standard deviation and calculate P(X > 900). This helps the company assess the quality and reliability of its product.
Example 2: Marketing Campaign
A marketing team launches a new campaign. Historically, 10% of customers click on online ads. If they show the ad to 1000 customers, what is the probability that more than 120 customers will click on the ad?
Using StatCrunch's binomial calculator, with n = 1000 and p = 0.1, you can calculate P(X > 120). This helps the team evaluate the effectiveness of the marketing campaign and optimize their strategies.
Example 3: Customer Service
A customer service center receives an average of 5 calls per minute. What is the probability that they will receive exactly 8 calls in the next minute?
Using StatCrunch's Poisson calculator, with λ = 5, you can calculate P(X = 8). This information is helpful for staffing decisions and resource allocation, ensuring adequate support for customers.
Exploring probability distributions equips us with the ability to understand and quantify uncertainty. But what happens when we want to go beyond understanding individual variables and start exploring the relationships between variables? This is where regression analysis comes into play, allowing us to model how changes in one variable might influence another. Let’s delve into the world of regression analysis using StatCrunch.
Regression Analysis: Unveiling Relationships Between Variables
Regression analysis is a powerful statistical technique used to model the relationship between a dependent variable (the one we're trying to predict) and one or more independent variables (the predictors). In this section, we'll focus on linear regression, which assumes a linear relationship between the variables. StatCrunch provides a user-friendly interface for performing regression analysis and interpreting the results.
Performing Linear Regression Analysis in StatCrunch
To perform linear regression in StatCrunch, follow these steps:
-
Load Your Data: Begin by importing your dataset into StatCrunch. Make sure you have your independent (predictor) and dependent (response) variables clearly identified.
-
Access the Regression Menu: Go to
Stat > Regression > Simple Linear. This will open the linear regression dialog box. -
Specify Variables: In the dialog box, select your dependent variable (Y) and your independent variable (X).
-
Optional Settings: Explore optional settings such as confidence level for intervals, hypothesis test options, and residual plots.
-
Compute! Click "Compute!" to run the regression analysis.
StatCrunch will then generate a comprehensive output including the regression equation, coefficient estimates, standard errors, t-statistics, p-values, and measures of model fit.
Understanding the Regression Output
The output from StatCrunch provides valuable insights into the relationship between your variables. Here are key elements to focus on:
-
Regression Equation: This equation takes the form Y = b0 + b1X, where Y is the predicted value of the dependent variable, X is the independent variable, b0 is the y-intercept, and b1 is the slope.
-
Coefficient Estimates:
- The y-intercept (b0) represents the predicted value of Y when X is zero.
- The slope (b1) represents the change in Y for every one-unit increase in X.
-
Standard Errors: These measure the precision of the coefficient estimates. Smaller standard errors indicate more precise estimates.
-
T-Statistics and P-Values: These are used to test the hypothesis that the slope coefficient is significantly different from zero. A small p-value (typically less than 0.05) suggests that there is a statistically significant relationship between the variables.
Assessing Model Fit and Interpreting Coefficients
Evaluating how well the regression model fits the data is critical. Here's how to assess the fit and interpret the coefficients:
R-Squared (Coefficient of Determination)
R-squared (R2) represents the proportion of variance in the dependent variable that is explained by the independent variable. It ranges from 0 to 1, where a higher value indicates a better fit. For example, an R-squared of 0.75 means that 75% of the variation in Y is explained by X.
Interpreting Regression Coefficients
The interpretation of regression coefficients depends on the context of your data. For instance:
-
Positive Slope: A positive slope indicates a positive relationship – as X increases, Y tends to increase.
-
Negative Slope: A negative slope indicates a negative relationship – as X increases, Y tends to decrease.
-
Magnitude of the Slope: The absolute value of the slope indicates the strength of the relationship. A larger slope implies a stronger effect of X on Y.
Residual Analysis
Analyzing residuals (the differences between the observed and predicted values) is essential to assess the validity of the linear regression model. Ideally, residuals should be randomly distributed with a mean of zero. You can use StatCrunch to create residual plots (e.g., scatter plots of residuals versus predicted values) to check for patterns or non-randomness, which could indicate violations of the assumptions of linear regression.
Exploring probability distributions equips us with the ability to understand and quantify uncertainty. But what happens when we want to go beyond understanding individual variables and start exploring the relationships between variables? This is where regression analysis comes into play, allowing us to model how changes in one variable might influence another. Let’s delve into the world of regression analysis using StatCrunch.
Data Management: Organizing and Transforming Your Data for Success
Statistical analysis is only as reliable as the data it's based on. The ability to efficiently manage and manipulate data is therefore essential for any meaningful analysis. StatCrunch offers a range of tools to facilitate this process, from importing and exporting data to cleaning and transforming it to suit your analytical needs. This section will equip you with the skills needed to prepare your data for success within StatCrunch.
Importing Data Sets: Bringing Your Data into StatCrunch
The first step in any statistical endeavor is to get your data into StatCrunch. StatCrunch supports various file formats, making it relatively easy to work with data from different sources.
Importing from CSV Files
Comma Separated Values (CSV) files are a common format for storing tabular data. To import a CSV file:
- Go to File > Open > From File.
- Select the CSV file from your computer.
- StatCrunch will automatically detect the delimiter (usually a comma).
- You can specify options such as whether the first row contains variable names.
- Click "Open" to import the data.
Importing from Excel Files
StatCrunch can also import data directly from Excel files (.xls or .xlsx). The process is similar to importing CSV files:
- Go to File > Open > From File.
- Select the Excel file.
- Choose the specific worksheet within the Excel file that you want to import.
- Specify whether the first row contains variable names.
- Click "Open" to import.
Importing from Other Sources
StatCrunch allows you to import data from text files, copy and paste data from spreadsheets, or directly input data manually. Exploring these options expands your ability to analyze data regardless of its original format.
Exporting Data Sets: Sharing Your Data from StatCrunch
Sometimes you need to export your data from StatCrunch for use in other software or for sharing with colleagues. StatCrunch offers several export options:
- Go to File > Save As.
- Choose the desired file format (e.g., CSV, TXT).
- Specify the file name and location.
- Click "Save".
Exporting to CSV format is generally recommended for compatibility with other statistical software and spreadsheet programs.
Cleaning and Transforming Data: Preparing Your Data for Analysis
Raw data often contains errors, missing values, or inconsistencies that can affect the accuracy of your analysis. Cleaning and transforming your data is a crucial step to ensure reliable results.
Handling Missing Values
Missing values are common in real-world datasets. StatCrunch offers several ways to deal with them:
- Deleting Rows with Missing Values: This is the simplest approach, but it can lead to a loss of information if many rows have missing values.
- Replacing Missing Values with a Constant: You can replace missing values with a specific value, such as the mean or median of the variable.
- Imputation: More advanced techniques, such as regression imputation, can be used to estimate missing values based on other variables.
To replace missing values, use the Data > Replace menu. Specify the variable, the missing value code (e.g., blank), and the replacement value.
Identifying and Handling Outliers
Outliers are extreme values that can distort statistical analyses. StatCrunch provides tools for identifying outliers, such as boxplots and scatter plots.
To create a boxplot, go to Graph > Boxplot. Examine the boxplot for points that lie far outside the whiskers, which indicate potential outliers.
Once identified, outliers can be handled by:
- Removing Outliers: If the outlier is due to an error, it can be removed from the dataset.
- Transforming the Data: Applying a mathematical transformation (e.g., logarithm) can reduce the impact of outliers.
- Winsorizing: Replace extreme values with less extreme values.
Transforming Data: Creating New Variables
Sometimes you need to create new variables based on existing ones. StatCrunch provides several tools for transforming data:
- Computing Expressions: You can use the Data > Compute Expression menu to create new variables based on mathematical formulas.
- Recoding Variables: You can use the Data > Recode menu to recode categorical variables or group continuous variables into categories.
For example, you can create a new variable called "BMI" (Body Mass Index) based on height and weight using a mathematical formula in the Compute Expression dialog.
Working with Different Types of Variables: Categorical vs. Quantitative
Understanding the different types of variables is essential for choosing appropriate statistical methods. StatCrunch distinguishes between categorical (qualitative) and quantitative (numerical) variables.
Categorical Variables
Categorical variables represent qualities or categories. Examples include gender, eye color, or treatment group. Categorical variables can be:
- Nominal: Categories have no inherent order (e.g., eye color).
- Ordinal: Categories have a meaningful order (e.g., education level: high school, bachelor's, master's).
Quantitative Variables
Quantitative variables represent numerical measurements. Examples include height, weight, or temperature. Quantitative variables can be:
- Discrete: Values are countable and typically integers (e.g., number of children).
- Continuous: Values can take on any value within a range (e.g., height).
StatCrunch automatically detects the type of variable based on the data, but you can manually change the variable type in the data window by right-clicking on the column header and selecting "Edit Column".
By mastering these data management techniques within StatCrunch, you can ensure that your data is properly prepared for analysis, leading to more accurate and reliable results. Efficient data management is a cornerstone of sound statistical practice.
Video: Master StatCrunch Calculator: The Ultimate Guide

FAQs: Mastering the StatCrunch Calculator
Hopefully, this guide helped you on your journey to mastering StatCrunch. Here are some frequently asked questions to clarify a few key points:
What exactly is StatCrunch?
StatCrunch is a web-based statistical software package. It provides a wide range of statistical analyses and data visualization tools. It's often used in introductory statistics courses and offers an alternative to desktop software. The statcrunch calculator is only part of what StatCrunch has to offer.
Is StatCrunch free to use?
No, StatCrunch is not free. Typically, you need a subscription or license to access it. Often, StatCrunch access is bundled with textbooks or offered by educational institutions. Check with your school or course materials for access information.
Can I use StatCrunch on my phone or tablet?
Yes, StatCrunch is accessible through a web browser, so you can use it on most devices with an internet connection, including phones and tablets. The statcrunch calculator features are accessible from any browser.
What's the difference between StatCrunch and Excel for statistical analysis?
Both StatCrunch and Excel can perform statistical analyses, but StatCrunch is specifically designed for statistics. StatCrunch offers a wider range of statistical tests and data visualization options. The statcrunch calculator offers a range of statistical applications within a user-friendly interface, making it more specialized than Excel.