Easy Thermometer Drawing Tutorial: Step-by-Step!
Embarking on a journey of thermometer drawing can be surprisingly simple! Many find inspiration from observing real-world medical thermometers. This tutorial will teach you how to create your own beautiful drawings of thermometers. With the right art supplies, you can transform a blank page into a stunning depiction of this iconic temperature-measuring instrument. Many children learn about drawing shapes in the classroom as an introduction to drawing, which can be easily applied to creating simple and easy thermometer drawings!
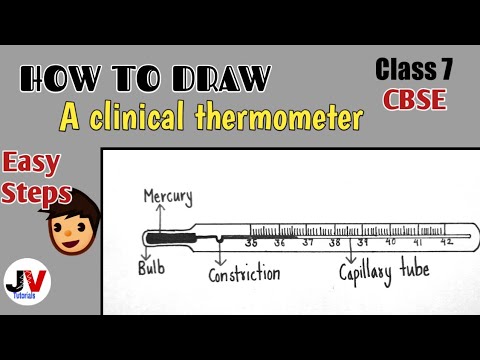
Image taken from the YouTube channel JV tutorials , from the video titled how to draw thermometer|how to draw clinical thermometer|class 7 thermometer diagram .
Hello there, aspiring artists and curious minds! Welcome to our step-by-step guide on drawing a thermometer. This tutorial is designed to make the process accessible and enjoyable for everyone, regardless of your current skill level.
Whether you're a seasoned artist looking for a quick project or a beginner eager to learn something new, you're in the right place.
What You'll Learn
This guide will walk you through the process of creating your own thermometer drawing, from the initial sketch to the final details. We'll cover everything from outlining the basic shape to adding the temperature scale and the liquid level.
By the end of this tutorial, you'll be able to confidently draw a thermometer and understand the basic principles of representing temperature visually.
Our learning objectives include:
- Mastering the fundamental shapes needed for a thermometer drawing.
- Understanding how to add realistic details, such as the temperature scale.
- Gaining confidence in your drawing abilities through a simple, step-by-step approach.
Why Draw a Thermometer?
You might be wondering, why a thermometer? Well, drawing a thermometer isn't just a fun activity; it's also a surprisingly useful skill.
For students, it can be a great way to visualize temperature concepts in science class. For artists, it can be a unique element to incorporate into various projects.
Drawing a thermometer can be both educational and creatively fulfilling. It allows you to practice your drawing techniques while also reinforcing your understanding of how temperature is represented visually.
It's also a great subject for practicing precision and detail in your artwork.
Gathering Your Art Supplies: Setting the Stage for Success
Before we embark on our creative journey to draw a thermometer, let’s ensure we have the right tools at our fingertips. Like any craftsman, an artist benefits immensely from having the appropriate materials. A well-prepared artist is an efficient artist!
Essential Drawing Tools: The Foundation of Your Artwork
Having the right supplies makes the drawing process much smoother. These are the bare necessities that will allow you to bring your thermometer drawing to life:
- Pencils: Your primary tool for sketching and outlining.
- Eraser: Indispensable for correcting mistakes and refining lines.
- Paper: The canvas upon which your creation will unfold.
- Coloring pencils/markers: For adding vibrant color and personality to your thermometer.
Choosing the Right Pencil and Paper
The type of pencil and paper you choose can significantly impact the final result. For beginners, a simple HB pencil is an excellent starting point. They offer a good balance between darkness and ease of erasing.
As you become more comfortable, you might want to explore different pencil grades. Softer pencils (like 2B or 4B) create darker lines, while harder pencils (like 2H) produce lighter, more precise marks.
For paper, a basic sketchbook or drawing pad will work perfectly. Look for paper with a smooth surface for best results with pencils and markers. Heavier weight paper is better if you plan to use markers to prevent bleed-through.
Adding Color: Temperature and Design
Color is a key element in bringing your thermometer drawing to life. We'll primarily focus on red to indicate the temperature level within the thermometer.
Red is universally associated with heat and will effectively convey the rising or falling temperature.
Feel free to experiment with other colors for the thermometer body and surrounding details. Blue is a common choice for the thermometer's glass or plastic casing.
However, the choice is yours, so embrace your creativity and personalize your artwork! Choose colors that appeal to you!
Adding color breathes life into our drawing, transforming a simple sketch into a vibrant representation of temperature. Now, let’s roll up our sleeves and begin the drawing process!
Step-by-Step Guide: Drawing Your Thermometer
This section will guide you through the process of drawing your own thermometer, broken down into manageable steps. We’ll start with the basic shape and gradually add details until you have a finished piece.
Step 1: Sketching the Basic Shape
The foundation of our thermometer is a simple, elongated shape.
Think of a long rectangle with a rounded bottom.
Lightly sketch this shape onto your paper.
Don't press too hard with your pencil. This initial sketch will be refined later.
Imagine a capsule or a slightly stretched-out oval standing upright.
This will serve as the main body of the thermometer.
A visual example or diagram can be incredibly helpful here. Picture a classic mercury thermometer – that’s the shape we’re aiming for.
Step 2: Adding Details
Now, let's add some essential details that define the thermometer.
First, focus on the bulb at the bottom. This is the reservoir for the temperature-sensitive liquid.
You can choose a rounded or slightly pointed style for the bulb, depending on your preference.
Next, define the tube that runs up the center of the thermometer. This is where the liquid rises to indicate the temperature.
Lightly sketch the basic shape of the bulb and the thin tube running up the center.
Now add the markings along the tube which will represent the temperature scale. Don't worry about making these perfectly accurate at this stage; we're just laying down the groundwork.
Step 3: Drawing the Temperature Scale
The temperature scale is crucial for making your thermometer recognizable.
Decide whether you want to include Celsius, Fahrenheit, or both.
Most thermometers display both scales, but you can choose just one for simplicity.
Carefully add the markings along the tube. Try to keep the spacing consistent for a neat and accurate look.
Use small, evenly spaced lines.
Accuracy isn't essential at this stage, but strive for a visually pleasing and balanced scale.
Step 4: Adding the Liquid Level
This is where your thermometer starts to show a temperature reading!
Draw a line inside the tube to represent the liquid level.
Typically, this liquid is red, so we'll keep that in mind when we add color later.
The height of the liquid level determines the temperature.
A higher level indicates a warmer temperature, while a lower level indicates a cooler temperature.
Experiment with different levels to represent various temperatures, from a mild 70°F to a scorching 100°F!
Step 5: Finalizing the Drawing
This final step is all about refining your drawing and adding those finishing touches.
Carefully erase any unnecessary sketch lines. This will clean up your drawing and make it look more polished.
Now, go over the main lines with a slightly heavier weight to make them stand out.
This adds definition and gives your thermometer a more professional look.
Pay attention to line weight; thicker lines for the outline and slightly thinner lines for the details.
A clean and crisp drawing is a joy to behold!
Adding color breathes life into our drawing, transforming a simple sketch into a vibrant representation of temperature. Now, we can take our drawing one step further, adding depth and realism using the art of shading.
Adding Depth and Realism with Shading
Shading is the secret ingredient that elevates a simple drawing from flat to three-dimensional. By carefully applying light and shadow, we can create the illusion of volume and form, making our thermometer appear more realistic and visually engaging.
Understanding the Basics of Shading
At its core, shading is about replicating how light interacts with a surface. Areas that are directly hit by light appear brighter (highlights), while areas that are shielded from light appear darker (shadows). By understanding this principle, you can strategically apply shading to create depth.
Consider the light source in your drawing. Is the light coming from above, the side, or directly in front? The position of the light source will dictate where the highlights and shadows fall on your thermometer.
Essential Shading Techniques for Depth
Several basic shading techniques can be used to create depth in your thermometer drawing. Here are a few to get you started:
-
Hatching: This involves drawing a series of parallel lines to create areas of shadow. The closer the lines are together, the darker the shadow will appear.
-
Cross-hatching: This technique builds upon hatching by adding another set of parallel lines that intersect the first set. This creates a denser network of lines, resulting in even darker shadows.
-
Blending: This involves using a blending stump, tortillon, or even your finger to smooth out the shading and create a more gradual transition between light and shadow. This technique is particularly effective for creating smooth, rounded surfaces.
-
Stippling: This uses dots to create shading. The more dots in an area, the darker the shading. This is a time consuming technique but can create interesting textures.
Highlighting and Shadows: The Key to Realism
Adding highlights and shadows is crucial for creating a realistic effect.
Highlights are the brightest areas of your drawing, where the light source is directly hitting the surface. To create highlights, simply leave these areas untouched by shading or use an eraser to lighten them.
Shadows are the darkest areas of your drawing, where the surface is shielded from light. Shadows can be divided into several types:
- Form Shadow: The shadow on the object itself that's not facing the light source.
- Cast Shadow: The shadow cast by the object onto the surrounding surface.
- Occlusion Shadow: The small shadow in a corner or crevice where light can't reach.
Pay close attention to the intensity and placement of your highlights and shadows. The greater the contrast between light and dark, the more dramatic and realistic your drawing will appear.
Experimenting with Different Shading Styles
There's no single "right" way to shade a drawing. Experiment with different techniques and styles to find what works best for you.
For instance, you can explore a realistic shading style, focusing on accurately replicating the subtle gradations of light and shadow.
Alternatively, you could opt for a more stylized approach, using bold, graphic shading to create a striking visual effect.
Don’t be afraid to break the rules and develop your own unique shading style. The most important thing is to have fun and let your creativity shine through!
Adding color breathes life into our drawing, transforming a simple sketch into a vibrant representation of temperature. Now, we can take our drawing one step further, adding depth and realism using the art of shading.
Exploring Different Thermometer Types
While we've focused on the classic glass thermometer, the world of temperature measurement is far more diverse. Exploring different thermometer types reveals fascinating variations in design and technology.
Understanding these variations can broaden our artistic horizons and provide inspiration for future drawings. Let’s take a peek at a few common types.
A Quick Look at Thermometer Variety
Here are a few thermometer types to consider:
-
Digital Thermometers: These use electronic sensors to measure temperature and display it on a digital screen. They come in various forms, from oral thermometers to those used for cooking.
-
Infrared Thermometers: Also known as non-contact thermometers, these devices measure temperature from a distance by detecting infrared radiation. You’ve likely seen these used to check temperatures during the recent pandemic.
-
Clinical Thermometers: Specifically designed for medical use, these thermometers provide accurate temperature readings for the human body. They may be digital or, in older models, use a mercury-free liquid.
-
Other Specialized Thermometers: The list doesn't stop there, of course. Many other types exist, like oven thermometers, aquarium thermometers, and scientific-grade precision thermometers.
Adapting Drawing Techniques
The fundamental drawing skills we've covered can be adapted to represent these different thermometer styles.
For example, a digital thermometer might involve drawing a rectangular screen and depicting the numerical display. An infrared thermometer could be represented with its distinctive gun-like shape and laser pointer (though never point this at someone's eyes when you are drawing it!).
Experiment with altering the shapes and details to capture the unique characteristics of each thermometer type. Consider the materials used, the display style, and any special features. By creatively adjusting our techniques, we can expand our artistic repertoire and accurately portray a wider range of temperature-measuring devices.
Video: Easy Thermometer Drawing Tutorial: Step-by-Step!

Frequently Asked Questions About the Thermometer Drawing Tutorial
Here are some common questions about drawing a thermometer, based on our easy step-by-step guide.
What kind of marker should I use for the outline?
A fine-tipped black marker or pen works best for outlining your thermometer drawing. It creates clean, defined lines. If you don't have one, a dark colored pencil will also work.
Can I use watercolors instead of markers to color the thermometer?
Yes, watercolors can be a great choice for coloring your thermometer drawing! Use a wet-on-wet technique for smooth gradients in the red liquid. Just ensure your initial outline is waterproof if you plan on using a lot of water.
What if I mess up a step in the thermometer drawing?
Don't worry! Drawing is all about practice. You can always erase pencil lines and try again. If you’re using pen, you can either incorporate the mistake into the drawing or start a fresh thermometer drawing.
Is there an easier way to draw the scale markings?
Instead of drawing individual lines for the scale, you can draw one long line and then add short perpendicular lines along it. Alternatively, a ruler can help keep the markings consistent for a more accurate looking thermometer drawing.